5 Important yoga poses for knee pain
Can yoga help with knee pain?
With some precautions, yoga can be considered beneficial in
knee pain, knee pain may appear to be a minor problem, but if it happens to you
then you can understand the problem caused by it. Swelling, redness, pain and
itching in the knees not only harm you physically but also mentally.
Knee pain is a very common problem affecting more than 19
percent of the world population. Because of this there is a risk ranging from
small injuries to many medical problems.
Many times this pain occurs in a particular part of the knee
or in the entire knee. If you do a little physical movement, it can increase
knee pain. In such a situation, we are advised to make a slow and controlled
movement so that the pain is reduced.
Yoga also does this work with the help of light stretching.
Yoga makes the knees healthy and flexible. They also help in strengthening the
muscles around the knees. These yogasanas suggested by Our Certified Yoga
Trainer Gourav Arya can play an important role in making your knees healthy.
If
you have read our series of yoga poses for beginners, then you will be able to
do this yoga comfortably.
Which yoga is best for knee pain?
5
important yoga poses for knee pain
1 Baddha Konasana | Bound Angle Pose | Cobbler Pose
|
2. Setu Bandhasana | Bridge Pose
|
3. Sukhasana | Padmasana
|
4. Vrksasana | Tree pose
|
5. Tadasana|Mountain pose
|
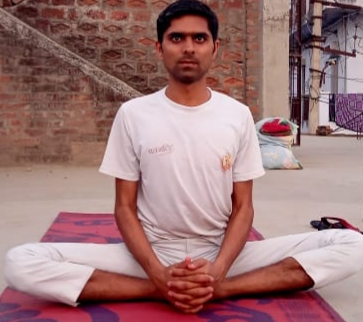
1 Baddha Konasana | Bound Angle Pose | Cobbler Pose
Baddha
konasana is made up of two words Baddha means tied and Angle means corner. It
is also called bound angle pose and cobbler pose. This posture looks like a
butterfly posture.
By
performing Baddha konasana, the problems caused by menopause are removed and at
the same time this asana stimulates the heart and is beneficial in the problem
related to knee pain. It can also help boost your fertility.
·
To do this first, sit in the posture of Dhandasana.
·
After this, like the butterfly posture, bend the knees
and join the legs with both hands.
·
Make sure that your soles are touching each other.
·
Try to move the feet as much as possible towards the
body.
·
After this, try to bend the knees on the ground with
hands.
·
Bend it as much as you can.
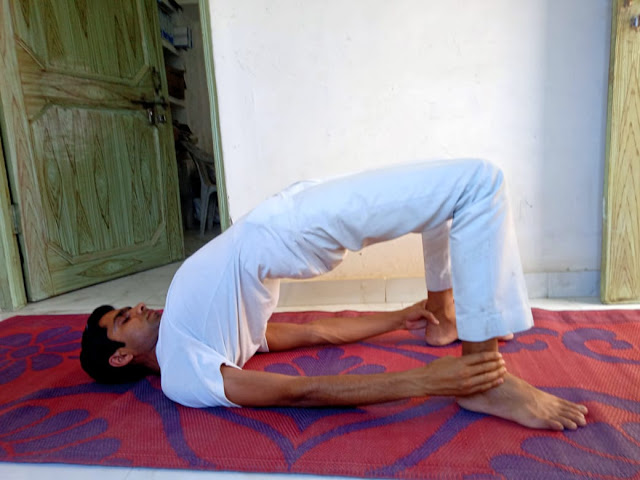
2. Setu Bandhasana | Bridge Pose
Knee
pain may be due to over-exercise, arthritis, and food imbalance.
Sethubandhasana fixes this and relieves the pain of the knees.
·
Lie on your back and bend your knees.
·
Knees and feet stay in a straight line.
·
There is a gap between the two legs.
·
The hands are adjacent to the body and the palms are on
the ground.
·
Breathing in, gently lift the lower, middle, and upper
most parts of your back off the ground.
·
Gently move your shoulders inwards. Apply the chest to
the chin, without shaking the chin.
·
During this, keep the lower body fixed. Both thighs stay
together.
·
If you want, during this time you can lift your upper
body with the help of your hands. You can also support your waist with your
hands. Keep the posture for 1 to 2 minutes. Exiting the posture while exhaling.
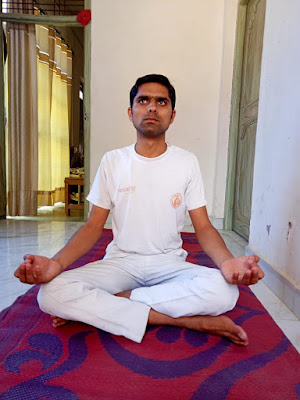
3. Sukhasana | Padmasana
By regular practice of this asana, you will
also feel mental happiness and peace.This yoga makes legs strong and cures knee
pain.If you are suffering from anxiety, depression or extreme anger, then doing
this asana will be of great benefit.By doing this asana, the mind is calm and
the mind is focused.This posture improves the habit of sitting.This asana also
reduces mental agility.This asana also relieves the spinal cord troubles.
·
To do Sukhasana, sit on a floor by laying a carpet or a
mat.Now keep both legs in front and straight.Then take the heel of one foot
under the thigh of your other foot and do the same with the other foot. (Fold
the palathe)
·
Now straighten your back and spinal cord. Be careful not
to bend over.
·
Release the shoulders slightly, now take a deep breath
in. Then release the breath slowly.
·
Place the palms on top of your palms.
·
Raise your head slightly and close your eyes.
·
Concentrate on your breathing, keep breathing deeply.
·
If there is difficulty in starting, then you can sit
against the wall.
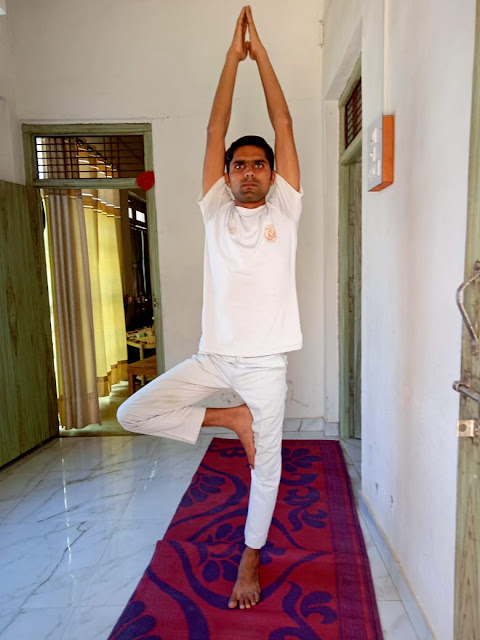
4. Vrksasana | Tree pose
Vrkshasana
is made up of two words 'Vriksha' means tree and Asana refers to yoga posture.
The final posture of this posture is absolutely firm, which looks like the
shape of a tree, hence it has been given this name. It is a meditative
meditation posture which is very well described in the practice of the old
kings such as King Ashoka. This is not only good for your health but also helps
in maintaining mental balance. Knee patients should practice this asana. With
regular practice of this asana, you can get rid of knee pain forever. If there
is more pain in the knee, it should be done under the supervision of a
specialist..
·
You should first stand up straight or come to Tadasana.
·
Reduce the space between the legs and keep the hands
straight.
·
Raise the right leg and hold the ankle with the right
hand.
·
With the help of both hands, place the right heel on the
upper part of the left thigh.
·
The direction of the toes should be towards the bottom
and press the thigh from the sole of the right foot.
·
Keep in mind that make the bent leg right-angled with the
other leg.
·
Now add the palms and fingers in the prayer posture, lift
it up and place it on the chest, then slowly lift them up and move them above
the head.
·
Both your hands should be adjacent to the head.
·
Keep the balance of the body for some time and keep this
state according to yourself.
·
Now move the hands down and return to the original
position.
·
Then do the same process from the other side.
·
It was a cycle.
·
In this way you do 3 to 5 cycles.
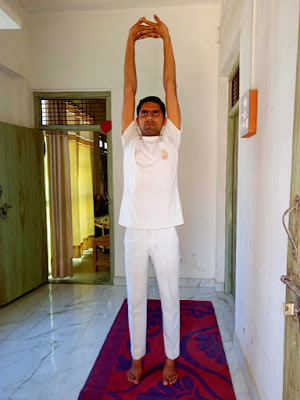
5. Tadasana|Mountain pose
Yogasanas
can be beneficial for the whole body, but some yogasanas work on certain parts
of the body. Similarly, Tadasana yoga also works specifically on knee pain,
thigh and ankles. A research conducted by Arizona State University has found
that the benefits of tarasana can help keep the spine straight, while also
keeping the knees, thighs and ankles strong. These advantages can be due to the
strain on the body during tadasana. However, more research is still needed on
this
·
For this, first you stand up and keep your waist and neck
straight.
·
Now put your hand over the head and while breathing,
slowly pull the entire body.
·
Feel the stretch from toe to toe.
·
Keep this state for some time and breathe out.
·
Then while exhaling, slowly bring your hands and body to
the first position.
·
In this way a cycle was completed.
·
Practice it at least three to four times.





0 Comments